On the 3oth October I had another craft class at the Glitterpot with Pam. The class again was ran by Jane Gill and the theme was 'trees'.
In the morning class we made the following 2 trees. Although you can't tell from the picture, they are both tall cards made from folding an A4 sheet of card vertically.
The first one was made by cutting a base tree and then using strips of different coloured green card/paper, stick together to form a layered tree. The edges were cut with a Martha Stewart edger. A few eyelets and gems were added. Trunk made from a piece of card and a ribbon tied round. The letters were embossed from a Crafts Too embossing folder and then stickles added. The word 'Christmas' was a stamp.

This card, again is an A4 tall card. The tree is made from a triangular template. Each layer was then cut again, an inch shorter than the previous layer. These again were edged with a Martha Stewart punch. The tree was then stuck together and then stuck on the base card. A ribbon was tied round the top and then the discarded snowflakes for the punch edge were used to decorate it. The greeting was stamped and then the word 'tree' which hasn't come out well was agin done with the Crafts Too embossing folder.

In the afternoon we made cards using Jane's own stamp set. The tree stamp comes in bits and is very versatile.
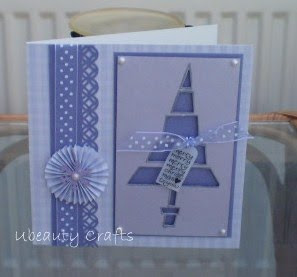
With the first card, the tree was stamped and embossed. The middle bits were then cut away. The tree was then layered onto another piece of card. The message was stamped onto shrink plastic and then shrunk down. It was then tied to the tree. The side panel edge was punched using a Martha Stewart edger. A piece of ribbon was then tied round and the panel stuck to the left hand side of the card. The rosette was made with a strip of paper, concertinered into a rosette shape. A couple of gems were then added to finish it off.
This tree was made with the same stamp but different bits of the tree were stamped onto different coloured paper. You can then assemble the tree as you like as long as it's a tree shape. A few gems and sparkly stickers were used to decorate the tree. A piece of ribbon was used to finish it off. The card is a mini DL card.

Thanks for reading


 This card is a triangular card again using various brads, buttons, gems etc to decorate it.
 In the morning we did the bauble. This first card was done on a tall A4 sheet. Decorated again with brads, beads, buttons, seed beads and stickles. A ribbon was used and a bow. A gold peel off finishes the card off.
 This was a c6 card. A piece of separate card was embossed using a Crafts Too folder. The bauble used is a peel off and decorated as the above.
 Thanks for reading


